Perhaps you already know that most FDM 3D objects are not printed as solids. That is because printing a solid 3D object would consume a large amount of material and take rather a long time to print. Though a 3D printed object that was hollow and used only a thin outer shell would be inexpensive and quick to print, this type of object would be impractical for many applications, as it would fail easily under the stress of normal usage. That’s why infill is used in 3D printing.
What Is Infill in 3D Printing?
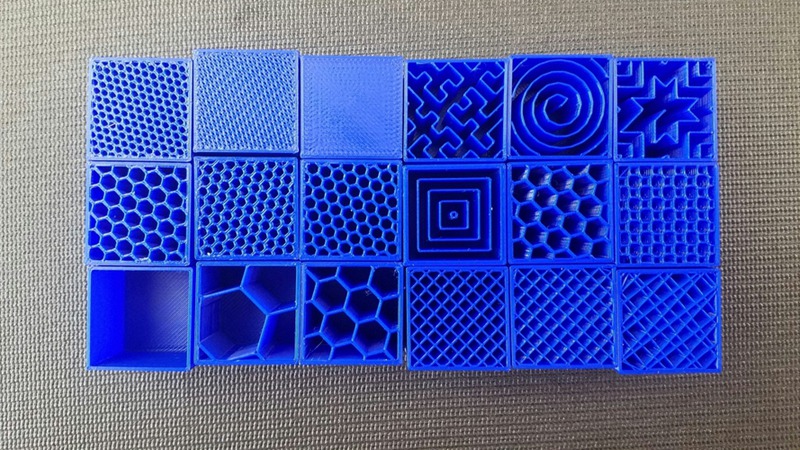
(Source: Kronr / Pinshape)
Essentially, infill is simply a repetitive structure used to take up space inside an otherwise hollow 3D print. Apart from filling the empty space in a 3D print, infill serves for other purposes. Infill settings very much relate to the strength of a 3D print, as they define the print’s internal structure. Moreover, infill enables 3D printers to print flat horizontal edges over empty space efficiently and reliably. Without infill settings, 3D prints wouldn’t have much structure or stability, making them incredibly fragile. With different infill percentages, patterns, styles and orientations, optimizing infill settings can be both challenging and rewarding.
What Is Infill Pattern?
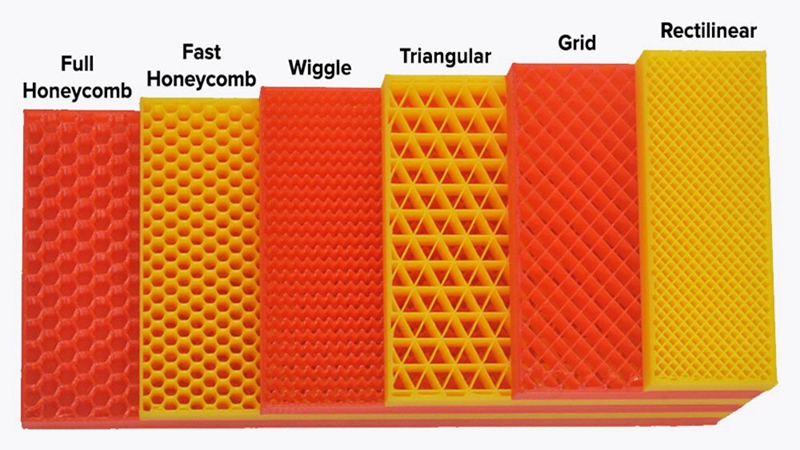
(Source: Simplify3D)
An infill pattern is used to build a strong and durable structure inside a print. Infill comes in different shapes, sizes and patterns, each with its own pros and cons between print time, structure strength, and material usage. Although infill can take numerous forms, there are some standard infill patterns.
Since infill takes up the empty space inside a print, it’s easy to understand that infill designed for structure works better than infill designed for aesthetics. Therefore, infill patterns incorporating grids, lines, honeycombs, and rectilinear or concentric patterns work best. As long as the infill percentage is properly set, these infill patterns give enough volume for printing between the gaps, allowing the 3D printer to print over the empty space more efficiently and accurately.
Which infill pattern suits you best depends on what type of object you’re planning to build and the 3D print infill strength you require. For example, rectangular pattern is a standard infill pattern providing a reasonable amount of rigidity in all directions. Being one of the easiest infill patterns to print, rectangular pattern requires a minimum amount of bridging on the part of your print head. Generally regarded as the most commonly used, strongest infill pattern, 3D Honeycomb pattern provides greater overall strength in all directions than a rectangular pattern but with very little increase in print time.
What Is Infill Percentage?
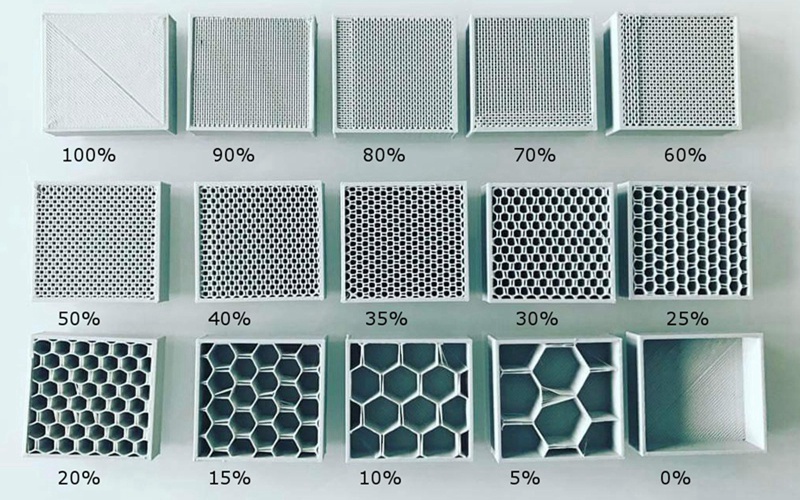
(Source: my3dprintpro.com)
Infill percentage, also known as infill density, defines the amount of plastic inside the 3D print. Generally speaking, the higher the infill percentage, the stronger the 3D print, but the longer time it takes to print. A higher infill density makes for a heavier, more solid 3D print, whereas a lower infill density would create a simpler, more lightweight result. In most cases, 5% – 20% infill is enough, and 100% infill is seldom used.
An infill percentage around 20% is used for 3D models with a visual purpose, while higher infill densities can be used for end-use parts. If structure isn’t a concern but filament usage is, the best infill range is from 10% to 15%. If you’re aiming for strength, as with a functional part, you can set the infill density to 100%. Of course, you can also set the infill density to 0% to print the 3D object completely hollow, as this is desired in some cases.
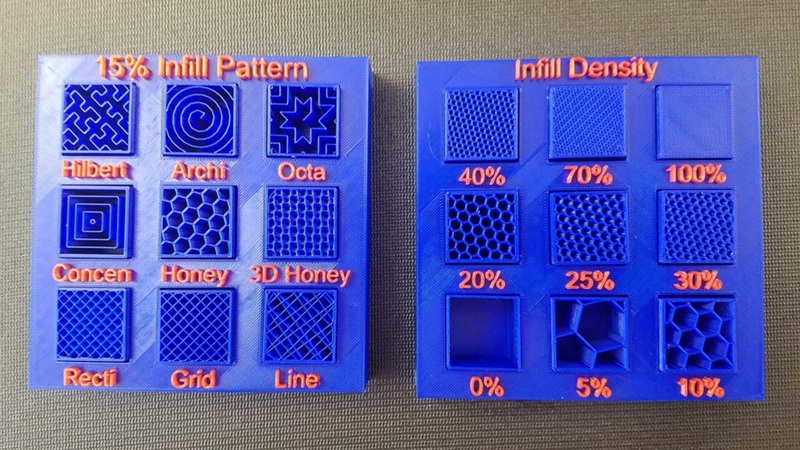
(Source: Kronr / Pinshape)
Varying combinations of infill percentage and infill pattern can affect strength, material usage as well as print time. Every increase in a 3D print’s strength comes with a corresponding increase in material usage and print time. The secret on how to use infill percentage and pattern successfully is to find the sweet spot where sufficient strength is achieved for a 3D object’s designed purpose, with both material cost and print time being kept within acceptable range. Though it can be a challenging task to optimize the infill settings from different infill densities, patterns, styles and orientations, with right knowledge, customization of infill settings such as infill density and infill pattern can be fun and rewarding!
Post time: Sep-06-2019